Silk-painting requires some specific materials which may be found in specialised shops. I will try to help you get a good idea of what you will need with the help of photos.
Firstly, whether you are planning to self-learn or join a silk-painting class, purchasing some literature about this art will be useful. Apart from learning about the materials, you will be introduced to the background history of the ancient art and that could be very interesting. There are various books available in the market. You can see my book on the photo below:
Other materials include special brushes- the ones we use for silk-painting have hard hairs, meaning that they keep their shape even when wet. It is better if you get a set of around five, with brushes of different thickness. You can check the photo below for a better idea.
You will also need sponges on a stick- these are necessary when painting a large piece of silk. The sponges will help spread the paint evenly over the silk, without any spots or lines.
Wooden frames are another essential component you will require. They are available in different sizes or lengths and you can also use various shapes- square or circle. I would advise you to get a square frame (adjustable) like the one in the photo below, but of a larger size, as that would give you more flexibility. Don't forget that despite your first project probably being not so big, it is better to have extra space available, as in the future you are bound to indulge in big projects- scarves or large wall-hangings.
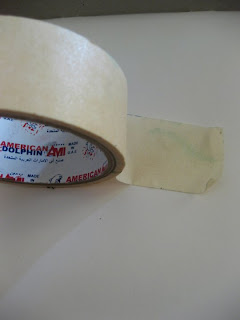
A paper tape like the one below is used to cover the wooden frame before pinning the silk on it. It protects the frame from getting painted and ensures a smoother pinning of the silk, as there will be less risk of minuscule wooden particles damaging your delicate fabric.
The silk you need is not the same silk your dresses or blouses are made of, unless it is 100% pure silk. The one you see below is silk number 5- it is transparent and very light. It is the best one for painting projects. There are various numbers of silk that you can purchase and they will have different thickness, therefore, suitable for different things- a framed picture, a wall hang, and finally, clothing.
However, as your first project would be a small painting, get number 5.
Pins are an essential component of silk-painting. Pay attention to the photo below- these are not simple every-day pins that you use to pin card paper to a blackboard. They have 3 needles and that is to protect your silk from ripping, which will be quite easy if it is pinned with a one-needle pin. A standard pin-box will also contain a little tool (next to the pins on the photo)- I would call it "unpinner"- to remove the pins without damage to silk, your fingers and your fingernails!
There are also various brands of paints available in the market. The most convenient ones are those which can be fixed with ironing. This will be mentioned on the back of the bottle and it means that after you have completed your painting and it has dried, you will need to cover it with a thin fabric and iron its backside for around 2 minutes. This will ensure that your paint stays on the silk no matter what!
Here are two paints that I use. I would advice to use the Setasilk, as is it is much more comfortable to pour paint without spilling it, which is often what happens with Marabu. However, shades and colours vary, so you will find yourself still needing to use both brands.
Another liquid component you need to purchase is called Gutta and it comes in different colours. It is a liquid which restricts the paint from spreading throughout the silk and outside the needed area. I will advise you to get guttas like the silver tube in the photo. It allows you more control over the flow of the liquid and is therefore, more accurate and neat.
You may also find cotton buds quite useful, especially when you need to correct a smudge or "erase" a drop of paint that you left on the silk by mistake.
I advise you to purchase a plastic container like the ones you can see in the photo below, to have your paints and materials well organized and easy to transport. Whether you buy a professional painter's kit-box or a simple plastic box with a handle and a lock, is up to you and your budget. I am using the simple box on the left and it keeps my paint bottles as neatly as necessary.


1 comment:
This painting is amazing. I would gift it to someone in a fancy box which i bought from The London Fancy Box. It would look even better them. Thanks for posting.
Post a Comment