Friday, August 26, 2011

Materials and Resources

Silk-painting requires some specific materials which may be found in specialised shops. I will try to help you get a good idea of what you will need with the help of photos.

Firstly, whether you are planning to self-learn or join a silk-painting class, purchasing some literature about this art will be useful. Apart from learning about the materials, you will be introduced to the background history of the ancient art and that could be very interesting. There are various books available in the market. You can see my book on the photo below:


Other materials include special brushes- the ones we use for silk-painting have hard hairs, meaning that they keep their shape even when wet. It is better if you get a set of around five, with brushes of different thickness. You can check the photo below for a better idea.


You will also need sponges on a stick- these are necessary when painting a large piece of silk. The sponges will help spread the paint evenly over the silk, without any spots or lines.


Wooden frames are another essential component you will require. They are available in different sizes or lengths and you can also use various shapes- square or circle. I would advise you to get a square frame (adjustable) like the one in the photo below, but of a larger size, as that would give you more flexibility. Don't forget that despite your first project probably being not so big, it is better to have extra space available, as in the future you are bound to indulge in big projects- scarves or large wall-hangings.


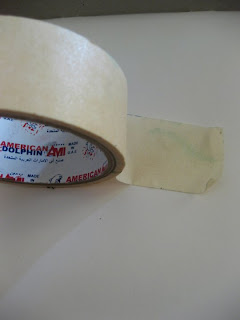
A paper tape like the one below is used to cover the wooden frame before pinning the silk on it. It protects the frame from getting painted and ensures a smoother pinning of the silk, as there will be less risk of minuscule wooden particles damaging your delicate fabric.


The silk you need is not the same silk your dresses or blouses are made of, unless it is 100% pure silk. The one you see below is silk number 5- it is transparent and very light. It is the best one for painting projects. There are various numbers of silk that you can purchase and they will have different thickness, therefore, suitable for different things- a framed picture, a wall hang, and finally, clothing. 
However, as your first project would be a small painting, get number 5.


Pins are an essential component of silk-painting. Pay attention to the photo below- these are not simple every-day pins that you use to pin card paper to a blackboard. They have 3 needles and that is to protect your silk from ripping, which will be quite easy if it is pinned with a one-needle pin. A standard pin-box will also contain a little tool (next to the pins on the photo)- I would call it "unpinner"- to remove the pins without damage to silk, your fingers and your fingernails! 


There are also various brands of paints available in the market. The most convenient ones are those which can be fixed with ironing. This will be mentioned on the back of the bottle and it means that after you have completed your painting and it has dried, you will need to cover it with a thin fabric and iron its backside for around 2 minutes. This will ensure that your paint stays on the silk no matter what! 
Here are two paints that I use. I would advice to use the Setasilk, as is it is much more comfortable to pour paint without spilling it, which is often what happens with Marabu. However, shades and colours vary, so you will find yourself still needing to use both brands.


Another liquid component you need to purchase is called Gutta and it comes in different colours. It is a liquid which restricts the paint from spreading throughout the silk and outside the needed area.  I will advise you to get guttas like the silver tube in the photo. It allows you more control over the flow of the liquid and is therefore, more accurate and neat.


You may also find cotton buds quite useful, especially when you need to correct a smudge or "erase" a drop of paint that you left on the silk by mistake.


I advise you to purchase a plastic container like the ones you can see in the photo below, to have your paints and materials well organized and easy to transport. Whether you buy a professional painter's kit-box or a simple plastic box with a handle and a lock, is up to you and your budget. I am using the simple box on the left and it keeps my paint bottles as neatly as necessary.




Friday, August 12, 2011

Basic techniques: Patterns.

Today I will introduce you to (or remind you of)  the preparations you need to undertake before actually starting on your first garment or item. 
As I suggested in my first post, it is better for you to start making items from a sewing magazine such as BURDA or any other brand which produces patterns (for example, http://www.simplicity.com ). Firstly, you will have to copy the patterns onto your fabric and there are two main ways to do this:

1 . By using tracing paper: you will need to secure your tracing paper on the patterns sheet by using something heavy. Then, by using a soft pencil just trace along the lines of your pattern, not forgetting to trace all the little details- darts, marks for buttons and all the other important signs that will help you sew your item correctly. You can see the tracing paper and the pattern sheet on the photo below.


After you are done with tracing all the necessary details on your tracing paper, you will need to cut them out and pin them onto your fabric. Don't forget that there are special ways of pinning the paper details onto your fabric. You will need to read through the directions given in your magazine or pattern package, and take a good look at the layout provided. Here is a photo to help you understand what I mean: 


I have made a mistake with the layout you see above, by not noticing the right-hand corner column and ending up having 2 details each, instead of 1. Therefore, as I said before, layout and directions are very important- will save you time of correcting errors later and help avoid wasting fabric.


And here is how the paper details look like when they are cut out and pinned onto the fabric:


Note that I am using the simple pins with an iron head. The fabric is linen and it is actually a new garment that I started to make today. It is nearly done , so I will upload the photos in my next post.

2. Coming back to our discussion . . . The other way to copy patterns onto your fabric is by using carbon paper.  The one used for sewing is usually of some light colour (not the black or indigo you might have seen in school or in old movies!), in order to leave hardly noticeable marks. This method involves placing the carbon paper between your fabric and the patter sheet (fabric - carbon - pattern sheet) and copying the patterns with the help of a tracing wheel or a pen with no ink. 

Personally , I have been using the first method as it is more friendly towards the pattern sheets- they don't get damaged, and moreover, the tracing-paper patterns could be reused again, if ever I wish to make the same garment. However, it is a very lengthy process, and until now I haven't reused any of the numerous patterns I am keeping. So , if you are planning to sew clothes for yourself only , I would suggest using carbon paper with a non-writing pen. But if you are planning to take your sewing onto a bigger scale, then it is better to keep the copies safe in big envelopes, with the name or code of its model/design. 

After you have pinned the pattern copies onto the fabric, you will need to cut the details, leaving 1-2 cm allowances for the seams, depending on the directions provided.  

So , this is how you prepare the details for your sewing project. In my next post I will talk about various  stitches and how to sew fabric details together. 

Friday, August 5, 2011

Sewing for beginners and not only- The Path of a "Sewurai"

I have been introduced to sewing in grade 5 at school and my first project was a pillow case- a simple, but a long-lasting one (is used until this day)! Since then the dream of my own sewing machine has followed me everywhere, and although I got one only in 2007, I have exploited any machine I could find- in my relatives' and family friends' houses. Today I have around 20 garments which I made myself, out of which 5 things were remade out of old "unused" clothes, and 3 were of my own design. Despite having some experience in sewing, I still lack some technique and knowledge. That is why I decided to start this blog- to track down my learning and in this way help others, like me, to learn. So here are essential things that I use and think you may need on your path to great sewing projects!

1. A book by Allison Smith. (Could be found in McGrudy's Book shop) It contains all the tools and techniques that a person requires to become great at sewing! Personally, I find it very good in terms of illustrations and techniques. Of course, there will be other books for beginners and I advise to choose the ones with real photos- it will be easier to understand what is required and how it is done. If you are planning to self-teach yourself sewing (as I did) such a book is an absolute must!  


2. BURDA magazine, which was founded in Germany decades ago by a talented woman- Aenne Burda. It contains a wide range of patters for every type of garment imaginable for every season and occasion - dresses, blouses, trousers and accessories. Every one can find something of their liking in this magazine. BURDA comes out on monthly bases and is a great way of learning thanks to detailed guidelines and advice. 
 It could  be purchased in any supermarket or shop in the journals section. 


3. A sewing machine OF COURSE! I have a BROTHER with 25 stitches. As I bought it 4 years ago, there may be better and modified models available now in the market, but I am pretty satisfied with how my faithful BROTHER works, so don't really need to replace it. There are other brands, such as Singer, Toyota, Juki and others (See other brand names here: http://www.allbrands.com/products/abc0092.html), but I can't really advise you on which is better, so you will have to decide for yourself or try out  those on the shops's display (or your friends' machines) and see which is the most comfortable. One advice I will give is- don't get the most expensive and "super-sonic" machine, as on your initial learning stage you will not use half of the features it offers, so will end up paying more unnecessarily. Don't forget that there are other tools you will need to buy, so save your money for later (till you reach the fabrics section that is!)


Every sewing machine will have a Manual booklet in its box. Don't disregard it, but study carefully- it will help you to get started and give you some idea on your machines' functions and general sewing techniques. I haven't studied it carefully enough, and ended up learning about how to make proper button-holes 4 years later!! Shame, I know! But I am here to help you avoid such mistakes! :) 


4. Equipment. You will need to visit a specialist tailor-equipment shop. Things you will need include: 
  • Needles- of various lengths. These usually come in a box-set.
  • Pins- these could be with little colourful ball-heads, or similar to nails. You will need them when fixing garment details together or securing patterns to fabrics.
  • Scissors- they come in different shapes and sizes, but make sure you get the tailor ones, as they are sharp and make nice clean cuts on fabrics. 
  • Tape measure- required to measure yours or someone's body when preparing to stitch something. They come in different lengths.
  • Tailor's chalk or pencil- used to make markings on fabrics. These markings are easy to get rid off and will not leave marks.
  • Tracing paper- useful when you wish to copy patterns from the pattern sheets without damaging them. You can also use a carbon paper with a tracing wheel, but like I said, these may damage the pattern sheets if used a lot. 
  • Seam ripper- a hook with a sharp blade which will aid in opening seams which came out wrong.
  • Threads- take all the rainbow colours and some extra shades if necessary (white and black are essentials). Trust me- it is better to have a wide range of colours ready, as sewing ideas pop in one's head every now and then and are quite unpredictable. 
  • Buttons- different shapes, sizes and colours will do. You will also need the little transparent ones in some cases (work blouses, inside buttons) and iron ones (for jackets, trousers, accessories).
  • Zippers- as with threads and buttons, you will need a few of those. Get various lengths and colours, and I would advise to get the more of invisible ones, as they can be concealed nicely when stitching them onto skirts and dresses. 
  • Fabrics- don't get carried away just yet! Start with buying some low-priced cotton or any other non-stretching fabric, as it will be easier to learn on it and will not be a huge loss if you spoil it. Start with buying 3-4 yards- that will be enough for practicing some techniques and making a simple garment, such as mini-skirt or a tunic. 

So here you go- these are the things that will help you to get started on your sewing. In my next post, I will talk about some techniques in detail.